February 14, 2011

Happy Valentines Day! - I love Apothecaries

Happy Valentines Day!
Well my life can get back to normal this morning.  My entire family, including my hubby, has been home for the past two weeks since the snow BLIZZARD of 2011 hit Southwest Missouri on February 1st.   Seriously a BLIZZARD???  I don't every remember having a blizzard in Missouri before.  Anyway, I am so happy to be back in a routine this morning.  Don't get me wrong I LOVE snow days and being with my family but TWO WEEKS!   By the second week everyone was sooooo bored. Ha!  Thankfully today they are all back in school and we can get back to a normal routine.  IF you call our life normal. :)


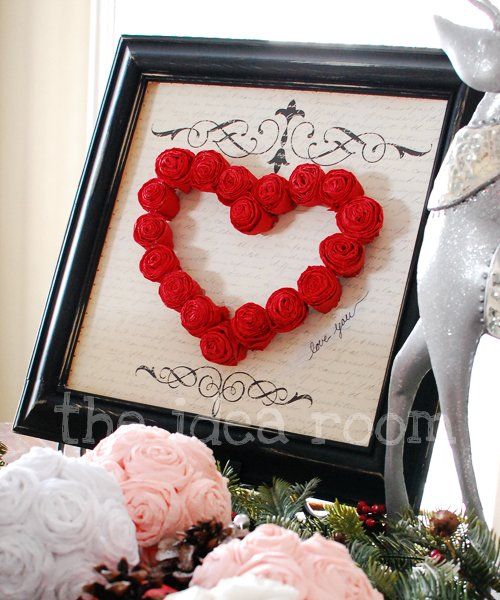
Here is my last Valentine post of the year...I know yeah!  
In addition to subway art which I featured last week, another one of my LOVE's right now is apothecaries.  
Here is how I decorated by apothecaries for Valentines Day this year:
In the smaller apothecary I have peanut MnM's...YUM, can't wait to eat them tomorrow :) ok focus, focus...I used a little trick in the middle so that I didn't have to use so many MnM's.  I took a regular piece of 8 1/2 by 11 card stock, rolled it up and secured it with tape.  Then I inserted it down inside the middle of the apothecary, then poured MnM's around the outside of the card stock.  This allowed me to use two bags of MnM's instead of 4 or 5.  
For the larger apothecary I used two bags of pink heart shaped marshmellows.  I probably could have used another bag because they have settled slightly to the bottom of the jar.
The little accents were purchased at TJ Maxx...so cute!  They were already attached to the red ribbon so I just opened the lid of each apothecary and inserted the knot end of the ribbon and set the lid back on,  they held perfectly.

What will I do with my apothecaries next?
Anyone have any great Easter Ideas and ways to use apothecaries?

February 11, 2011

Valentine Subway Art

One of the HOT trends right now is Subway Art!  
I must admit, I am obsessed with subway art.  They seem to be everywhere.
Have you printed your FREE subway art?  If not hopefully I can help.

As soon as my Christmas Decorations were put away I began thinking about Valentines Day.  Not sure where the inspiration came from, I guess it was because my Christmas decorations were VERY, VERY slim this year due to a family illness.  Thank you to five of my wonderful friends for surprising me by decorating my house, I know my Christmas decor would have been non existent this year without their help.  I still can't thank them enough for what they did for our entire family.  


In the past my Valentines decorations have been VERY, VERY slim unless you consider  setting out a red candle and a heart frame decorating. :)  This year I found so many CUTE Valentines Ideas that I just couldn't resist.  Here are a couple of Subway Art downloads that I have printed, framed and on display in my house.  

Not just a Housewife has this printable in four different variations for you!
I have to show you this adorable printable that is sitting on my entertainment center
it is soooo cute..."I love LOVE"!  I have it displayed in a black $3.00 frame that I purchased at Walmart.  Cheap but oh so cute!

I really wanted to share the above Printable with you...sadly I can't find where I printed it from.  I will keep looking! 
(If you happen to be reading this blog and this is your creation PLEASE let me know so I can link to your site.  Thank you for this awesome printout!)
Here are some additional FREE subway art printables!!
Thank you Eighteen25 for sharing the following with us!  It is available in two color choices too!

 Blooming Homestead has this adorable print available in 5 different colors!
Today's Fabulous Finds has nine prints with a background and one without a background that can be printed onto any color of paper you like. (Lighter colors will look best.)


Print yours today, just in time for Valentines Day.
Wishing you a wonderful valentine weekend...Happy Valentines Day!

February 10, 2011

Framed Heart

How fun is this...We LOVE this Valentines Project with a (re)Finished Frame!!!!


Photobucket

Simple Valentine Treat

ANOTHER SNOW DAY!
Here is a very simple Valentine Treat that can be ready in minutes.

Valentine Funfetti Cookies
 Ingredients:
1 Valentine Funfetti Cake Mix
1/3 Cup Vegetable Oil
2 eggs

Mix all ingredients together in mixing bowl, then drop by spoonful onto greased cookie sheet.  Bake for 8-10 minutes at 350 degrees.


When cookies have cooled frost with your favorite Cream Cheese Icing and sprinkles.

A great simple snack that kids of all ages will love!


This post is linked @
Remodelaholic

February 9, 2011

Valentine Treat - Red Velvet Cake Balls

It's a SNOW DAY (again). :) 
Time to do some Valentine baking!

Have you discovered the TRENDY cake balls?  There is something just incredible about red velvet cake and cream cheese icing mixed together, then covered by a coating of chocolate!  Can you say LOVE at first bite!  

One of the greatest things about being Twins is we were always celebrating together.  Every year our Grandmother would make our FAVORITE cake for our birthday, her homemade Red Velvet Cake...still our favorite cake today.  So you can imagine how excited we are to share this recipe with you. 

Though we could have made our classic red velvet cake recipe from scratch, today we were in a hurry to get our sugar fix...so we chose to grab a box of Duncan Hines Moist Deluxe Red Velvet Cake Mix out of the pantry!


Red Velvet Cake Balls
1 box red velvet cake mix (cook as directed on box for 13x9 cake)
1 can cream cheese frosting (16oz or approximately 2 cups of homemade cream cheese icing)
1 Package almond bark (chocolate or white chocolate) OR you can use chocolate chips
wax paper

Now here is the fun part, after the cake is completely cool crumble into large mixing bowl.  


Mix thoroughly with 1 can cream cheese frosting. (It may be easier to use fingers to mix together, but it will be messy.)  


When finished mixing it will be the consistency of a thick dough.  Roll mixture into quarter size balls and lay on cookie sheet.  Place in the freezer until ready to coat in chocolate.  (Do not freeze completely)


Melt chocolate in microwave according to directions on package.  Dip and cover one cake ball at a time using either a spoon or a dipping fork, then place on wax paper.  It may be helpful to only melt a few pieces of chocolate bark at a time because it starts to cool and thicken. It’s easier to work with when it’s hot.
Ok so we are not the greatest Chocolate Dippers...hopefully yours will look WAY better!!! :)


You can also try it with other cake and icing combinations.


If you happen to have a snow day...try making some Cake Balls!

February 7, 2011

(Re)Finished Frame

Today we are featuring a simple (re)Finished project that can update your decor in a little over an hour!  Anyone can do this.  

The culprit is a simple old maroon and gold frame that was actually still sitting in my living room...I know SAD.  (Ok so we forgot to take a before shot...but here is one exactly like the one we (re)Finished but it is all Gold).  


To (re)Finish an old frame and give it an up to date look.
1.  Spray on two coats of white spray primer.  Wait approximately 10 minutes between each coat.  When finished it should be a dry chalky consistency.

2.    Spray 2-3 light coats of White Gloss spray paint.   Again waiting for it to dry between each coat.  I also love using black spray paint to update frames and accessories.

3.  Then the fun begins when you start antiquing...to add a little character. :)  For this project I used Antique Gold Rub `n Buff. 

This is what the package looks like and I usually buy it at Hobby Lobby.

The unopened bottle below is the actual color I used (Antique Gold).

4.  I applied the Rubb `n Buff with my finger but I am sure you could use a brush too.  I applied a VERY SMALL amount and just rubbed on areas that I wanted to highlight.  This stuff goes a LONG way...I think one tube will antique my entire house!!!  =)

This is the finished project...


February 4, 2011

Are you (re)Finished?

Remember the old song, "He's Still Working on Me?"  It brings back memories at our house. 


This song is usually a children's song but as adults it has special meaning to us as well.  As we get older it is easy to reflect on the things we have done in our lives that are both good and bad.  Occasionally we dwell on the bad. 

Sometimes we can't get past the things we have done in our lives and have trouble starting life anew or making a decision to follow Christ.  It's kind of like an old rough piece of furniture.  Many people see a piece of used furniture and throw it to the trash but those of us that love to (Re)Finish know that even the ugliest piece can become new again with a little bit of work.  It just takes a decision to get started.

We're so thankful for God's amazing grace.  We are thankful God hasn't given up on (Re)Finishing us...he's still working on us to make us what he wants us to be.